How would you like to play tennis without having to spend hours practicing? Well, now you can thank these Tennis Ball Machines. They allow you to practice at home without spending too much time or energy.
Tennis ball machines are an essential piece of practice equipment for every player. They provide a good range of compatibility during the game and improve your skills. If you want to get better, you should invest in good quality tennis ball machines.
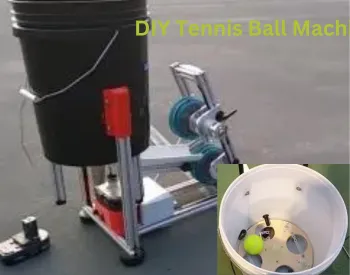
You don’t need to go out and purchase expensive tennis ball machines anymore. Here I have told you an easy way to create a tennis ball machine of your own. It is quite a straightforward DIY ball-throwing machine using cost-effective items.
How to build aDIY Tennis Ball Machine – 15 steps to follow
Though there are a lot of cheap tennis ball machines in the market, they are not so durable and effective. So you can make your own tennis ball machine, using affordable equipment. By doing so you can create your own best tennis component. Following the guide below, you can create a tennis ball machine with ease.
Step 1:
You need to create a frame for the machine. It should have an L-shaped configuration. You can use plastic or metal to make the frame.
Step 2:
Attach two right-angle connectors at the back of the frame. It gives a triangle structure and is easy to make the rest.
Step 3:
Now, you have the mainframe. But don’t screw the four corners as you require to install the foot pads. However, you should work with lock nuts as the frame will vibrate strongly while operating.
Step 4:
Install the foot pads in the four corners using screws and complete the frame. Must use rubber foot pads.
Step 5:
Now, let’s ready the friction wheel. Attach the shaft to the wheel module and tighten the screws.
Step 6:
Attach two rivets and a timing belt to the fraction wheel using glue. Leave the headless screw, and I will fix it after the complete assembly. Ready another friction wheel using the same process.
Step 7:
Install the friction wheels to the frame, and you are required to use side beams. One friction wheel should be installed at the bottom of the frame, and the other will be placed a bit higher on the frame. The side beams will be screwed in opposite directions. It looks S-shaped.
Talking about the distance between two friction wheels, there should be enough space for a tennis ball. In this stage, you also should set the timing belt. The long side of the belt should be on the top side and the shorter one should be on the downside.
Step 8:
Then, start attaching the synchronous belt wheels to the tennis ball launcher motor. Bring out the timing belt through the shaft and attach it to the motor. It would be better to use a CNC drill to assemble the shaft with the motor with ease. You will need two same-sized motors. Prepare another motor in the same process.
Step 9:
You need two motor brackets to attach the motors to the frame. Screw the brackets and install the motor. Meanwhile, cover the timing belt through the synchronous belt wheels. Make sure the belt is as tight as you can.
Step 10:
Since it is a cantilever structure, it can easily be damaged due to vibration. So we will use some bearing on the other end of the shaft of the frame. While adjusting the bearings, make sure the tension of the timing belt is right and close it on the thread slot.
Step 11:
Two beams can be added for more stability to the frame.
Step 12:
Till now, the physical structure is complete. Now, fix the circuit system. First, attach the wire to the motor through welding. You should use 1.5mm 2 sections of wires. Must use a protective tube over the weld’s head to prevent short circuits.
Step 13:
You need two pieces of motor-speed-control board. It works to modulate the output voltage and control the motor speed by the knobs. These types of boards support up to 12V-30V input voltage. Place the current boards on an acrylic board.
Step 14:
Place the acrylic board with the circuit board on the frame. Use the support of the beams to place it.
Step 15:
Splice a power cord and attach it to the battery. Make sure the cord is connected to both circuit boards and make a secure T-joint. Now, attach it to a power outlet or a battery.
Now, you are all set and give a try to your new creation
Benefits of a DIY Tennis Ball Machine
A DIY Tennis Ball Machine is an incredible investment for any tennis enthusiast, whether you’re a beginner or an experienced player. There are numerous benefits to incorporating this tennis training equipment into your practice sessions, and the best part is you can make one at home using affordable materials. Here are the main advantages of having a DIY Tennis Ball Machine in your training arsenal:
Convenience:
One of the most significant benefits of a DIY tennis ball machine is the ability to practice anytime, anywhere. This equipment allows you to train on your schedule without needing to coordinate with a training partner, making it easier for you to stay consistent and committed to your tennis practice.
Customization:
A DIY tennis ball machine puts you in charge of the ball’s speed, direction, spin, height, and feed rate. This level of control enables you to work on specific shots and techniques tailored to your unique skill level and gameplay, ensuring targeted improvement and growth.
Improved Fitness:
A tennis ball machine aids in enhancing your overall fitness through extended practice sessions, as it can hold a large number of balls in its hopper. This feature allows for longer rallies and more intense workouts, ultimately contributing to increased endurance, stamina, and overall performance on the court.
Enhanced Technique and Form:
With a DIY tennis ball machine, you’re able to focus on perfecting your form and technique through repetition. Consistent ball feeds enable you to practice the same shot repeatedly, allowing you to make adjustments and fine-tune your movements, ultimately leading to a more refined and improved technique.
Affordability:
Creating a DIY tennis ball machine is a cost-effective solution to purchasing a pre-made, high-end machine. By utilizing affordable materials and following step-by-step instructions, you can enjoy all the benefits of training equipment without breaking the bank.
FAQ:
How do you make a tennis ball machine?
While making the tennis ball machine, you have to maintain three stages. The main base, friction structure, and the motor part. The whole process is described above in the article.
Is it worth getting a tennis ball machine?
A tennis ball machine is a great piece of equipment for practicing at home. A beginner player can improve skills by practicing through the machine. However it is not worth it for pro players as the machine serves one type of shot.
How do you make a ball launcher at home?
To make a ball launcher at home, you require some items like a metal frame, wheels, motors, circuit boards, etc. Once you collect the equipment, you can create a tennis ball machine following our guide.
Can you use normal tennis balls in a ball machine?
Yes, you can use normal tennis balls in a ball machine. Tennis balls are designed to be used in a variety of different environments and situations, including in ball machines. As long as the balls are in good condition and suitable for use on a tennis court, they should work fine in a ball machine.
Quality tennis ball machines are expensive. If you don’t want to invest on a larger scale, then try this DIY tennis ball machine. It is a cost-effective tennis ball machine and is best for practice.
Hello, I am Robert A. Foreman founder and chief writer at Indorgames. I have had experience in Tennis for a long time since 2016. I know the exact problems that a beginner faces and know the solutions too. I have shared all my knowledge about Tennis on my website. Feel free to read them and learn more important things and facts about Tennis. follow me Twitter


Hi Robert,
Great article. Could you give details about hardware? Motors, controller, power supply. It would be very helpful if you provide a link as well.
Thanks